2.04.2011

Creative Corner...Scrap Club

For December Scrap Club we used the title BELIEVE. I turned my scalloped circles into ornaments by drawing a string with a white gel pen. I also popped 2 of the 3 of them up with dimensional adhesive.

For the Bonus layout we used the title MERRY. I decided to add a second page and use this as my Christmas card photo spread. I used to try and incorporate the whole photo cards on my pages but this took up way too much space. So the last few years I have been cropping the photo cards! I love how this layout came together!

If you are interested in getting in on the scrapbook kit action, check out Jamie's blog for more information.

2.03.2011

Letter Pp

"P" topics...pig, princess, pizza

{Circle Time}
Calendar...Talk about the month and days of the week and put sticker on the day we are discussing.

Reading...days of the week book...Pigs to the Rescue by John Himmelman
...theme books...My "p" Book by Jane Belk Moncure
Princess Pigtoria and the Pea by Pamela Duncan Edwards
If You Give a Pig a Party by Laura Numeroff
Shiver Me Letters A Pirate ABC by June Sobel
Pete's a Pizza by William Steig

Songs/Rhymes...The P says...

{Letter Craft}
P is for Pig...{this one is my design}
{Activities}
Coloring...Letter Pp,
pigs on a farm

Letter Identification...
find the letter worksheet,
...do a dot letter printables
...letter tracing p

Spelling...We worked on spelling PIG this week. I wrote the word and drew a picture on our dry erase board. Each day I had Little Bit spell and sound out the word.
...tray with magnetic letters and cards with words {PIG, PAT, PEN}. Little Bit placed the corresponding letters over the letters on the cards...while sounding out each letter.

Pigs...dot to dot pig. This is a great exercise for getting letters in the correct order and drawing lines!
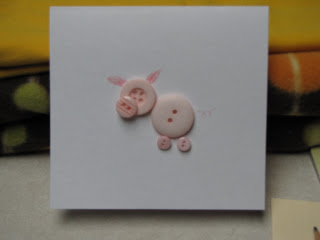
...button pig. We used pink buttons and glued them on a card to look like a pig. Then I drew in ears and a curly tail.
Activity shelf...felt pizza; hidden picture page {finding o & p objects}; nuts & bolts match up; pizza lacing card; pom pom transfer w/tweezers; marble transfer to star suction mat; "snow" sensory box {filled with all things white....pom poms, cotton balls, candle, pipe cleaners, beads, bowl, scoop}

Computer time...Starfall {we worked in the ABC section with the letter P}
...Little Bit also loves to get in some computer time when we go the library. They have computers set up in the children's area with games, stories, etc. She loves working on Jump Start PreK!

Snacks....popcorn, pickles, pizza

2.02.2011

{sweet} shelf!

I think this is my favorite area of Valentine's decor in the house. I love this little mirrored shelf but it is a little tricky to decorate. The ledge is not very deep, so I am limited as to what will fit. So I am always on the lookout for cute narrow items to display here....


The little pink "love" vase came from Michaels dollar bins. I stuck 2 heart picks inside that I found at the Dollar Store. For the faux cupcake I made a yarn ball, stuck a red brad in the top to represent a cherry, and stuck it in a mini foil cupcake wrapper! I also filled a glass jar with some conversation hearts....love how this looks! And you know I can't let a holiday pass without breaking out the scrabble letters! I went with the word "sweet" since there is candy and a cupcake on the shelf!
I had seen this tutorial for a felt heart a while back and bookmarked it cause I thought it was super cute. Well, I found a styrofoam heart at Michael's for like $1.49 and was excited to make my own. I kept putting it off because I really didn't want to cut out a ton of felt circles by hand. Then I thought to myself, I have a bag of rose petals that I got at the Dollar Store...why not use those?! So I did and I think it turned out fabulous!

Just lovin' my {SWEET} shelf!

2.01.2011

{hanging} schoolwork...

When we started doing projects and worksheets we needed a place to display them. For a while I was just using Fun-tak to hang them on the wall but that was getting old fast. So I came up with this idea.....
I hammered 2 nails in this short wall as far apart as I could get them. Then I used some twine and tied it to each nail. Small clothes pins are hanging on the twine and hold the worksheets. I change out the die cuts on the end based on the holiday or season. We started with leaves for fall, then snowflakes and now have hearts up!

Here you can see most of our N worksheets being displayed!