Showing posts with label Sewing. Show all posts

11.25.2011

wristlet clutch

With today being Black Friday and all...and lots of shopping going on, I thought it would be the perfect day to show off my wristlet clutch refashion!

I have been wanting a cute clutch to use when I don't' need to carry a big purse, like on Black Friday! I wanted one that was roomy enough to throw in my basic essentials....wallet, phone, lip gloss, lotion, mints, sunglasses...etc. I just didn't want to spend much money on, so I haven't purchased one yet.

Then one day I was looking for something in the bathroom cabinet and I stumbled upon this oversized makeup bag from Clinique. It had potential. It was roomy, cute and had a wrist strap...and it was in my cabinet not being used...score!


I wanted to jazz it up a little bit though. So I found some fabric in my stash that matched perfectly and made a little ruffle accent strip. I then hot glued it onto the bag and tada....a cute, roomy wristlet clutch....for FREE!

9.22.2011

{minnie} outfit

A friend loaned us a great outfit for Gracie to wear when she met Minnie and Mickey at Disney World last year. I knew I wanted her to have something special to wear again this year. So when I came across this polka dot shirt at Dollar General I knew it would be perfect for a refashion!

The shirt was only a size 18 months, so I had to alter it. So I cut off the bottom 2 ruffles and attached them to a white tank that Little Bit already had. Then I used some of the leftover fabric to make 2 flowers, 1 for the shirt and 1 for a hair clip!

I paired that with some black leggings and she is good to go!

5.12.2011

shirt repurpose {& purse organization}...

I found this shirt at Goodwill last week and thought it was super cute...well it didn't quite fit me right but I loved the fabric. So I decided to get it and repurpose the material! {Sorry for the blurry picture.}

I recently got a new turquoise purse and thought this fabric would make some great accessories for it...and help me stay organized as well! ;)


I have had a tissue holder on my to make list for quite some time but just haven't gotten around to it.
I used this tutorial from Skip to my Lou. It didn't take much fabric and was super easy to put together! A package of tissue from the travel section fits great inside!

I really wanted to see how much of this shirt I could use so I saved all the material except the elastic part in the center. I used one of the straps to make this key fob. For the fabric flower I used this pattern, cutting the scalloped circles from the top of the shirt!

I still have quite a bit of fabric left to make a business card holder like B is for Boy featured here. We met recently at my garage sale. I was selling some bags of fabric and we got talking about sewing, blogs and the like! Just goes to show you never know where you will meet new friends! We exchanged business cards...I happened to have my cards in the house but if I was out and about I would need a fun way to carry them around....so after seeing her post about the card holder it is now at the top of my to make list! {Make sure you check out Erica's blog and Etsy shop...she has some great tutorials and wonderful items for sale in her shop....the tie/belt sets for little boys are adorable!}

4.12.2011

dress to skirt refashion...

I was in the Dollar Tree several weeks ago and saw this baby dress. I thought it was some cute fabric and so for $1 I got it to do something with.

I got the biggest size they had which was 18-24 months, basically just for more fabric to work with. After looking at the way it was made I decided to turn it into a skirt for Little Bit!

I started by using a seam ripper to remove the straps from the back of the dress.

Then I cut the top part off the dress, so the front and back were now even.

The back already had some elastic in it, so I just hemmed the part I cut off and tada....a finished skirt!

Here is my little model striking a pose in her new outfit! I found an off white shirt at Target to go with the skirt. We paired that with some brown leggings she already had.

This project was {SEW} simple and turned out super cute!!!

Linking up to Workshop Wednesday!

3.24.2011

i {heart} zippered pouches!

I just love zippered pouches! You can never have too many, right?! They are great for containerizing....especially all the stuff in my purse. I have one for my necessities {lip gloss, lotion, sanitizer, bandaids, tylenol, etc...}, several for snacks, one for library stuff {library card, change, pen}, and now one for toys...

...See that little pony peaking out of there?!

I have seen so many cute handmade ones online that I finally decided to try one myself. I found two {here and here} fairly easy tutorials that I really liked. So I took parts from each and came up with something that worked for me.

This was my first time working with a zipper! I am so not a great seamstress by any means. It is far from perfect but it is my creation and I love it!

3.16.2011

a {hoot} of a baby gift...

This past weekend Little Bit and I traveled to a baby shower for my cousin's wife. She is such a cute little preggo! She is not finding out the gender of the baby so gifts had to be neutral. I chose to go with an owl theme...cause they work for girl or boy and who doesn't love owls?!

I decided to embellish a white onesie with a little owl. I just freehanded a pattern and cut out all the pieces, using brown and green fabric. I used Wonder Under to adhere all the pieces to the onesie. I then sewed green buttons on to enhance the eyes.

I also made a couple burp cloths. I found a cute owl print at JoAnns that looked pretty gender neutral and paired that with some fabric I had on hand. They coordinated great! Here are some girly burp cloths I made a while back....{tutorial link is in that post}.

Little Bit helped pick out 2 books with owls in them to complete our owl themed gift!

I also included a little zipper pouch filled with some {new mommy necessities}!...hand sanitizer, lip gloss, lotion, kleenex, shout wipes, ibuprofen & gum.

11.06.2010

owl hat...

I have been seeing owl hats everywhere lately....Children's Place, JCPenney, blogland....so I decided to try and make one. I was inspired by this cute one but went pretty simple with mine...{and it only cost me a buck!}.

I started with a brown hat from the Dollar Tree. I took some brown embroidery thread and wrapped it around gathered sections at the top of the hat to make little ears. Using some scrap fabric and felt I cut 2 sizes of flowers out for the eyes. I sewed a button in the center of each eye. Then using another scrap of fabric for the beak...I cut a triangle out with pinking shears. I hand stitched around the beak and outer eyes.

Here is a close up of the finished product!

10.12.2010

{flowery} skirt

Little Bit has been loving skirts this year. Plus she loves when I make her stuff....she says, "You made that FOR ME?!"....I'm like yep, I sure did. The she usually say, "OH BOY!" I love that she gets so excited.
So this skirt fits both her loves, it's a skirt, obviously, and I made it! Only 2nd one I have made {other one is here}. They are super easy to put together. I used this tutorial as a starting point but did adjust some based on Little Bit's size. I got the fabric at Joann's on clearance!

Luckily, she had a pink shirt that matched great. I just jazzed it up a bit with a fabric flower.

And of course I had to make one for her hair too!


7.29.2010

Cutesy baby burp cloths

I saw this tutorial and decided I wanted to make some of these for a friend who recently had a baby. They were quick and easy to whip up!...and turned out just adorable! {I think so anyway!!!}

6.29.2010

{supergirl} cape...

Little Bit has been going around jumping off the couch, acting like and saying she is "superman", so I thought she might like a cape to wear. I had looked at several tutorials but wanted something cheap and simple! So on one of my Dollar Store runs, I browsed the kitchen towels and found this mostly white one with a few colorful stripes at the bottom. I thought it would work perfectly!

I took the plain white end and gathered it to create the collar. Then I added some red satin ribbon that I had on hand {to bring in some more color and to have something to attach the Velcro to}. You could be done now, but I wanted to personalize it a bit more. Sooooooo, I took some more of the satin ribbon and laid it out to make a G {first letter of Little Bit's name!} in the middle of the cape. Once sewed in place, I let Little Bit try it on and HAVE FUN!!!

Linking up to:

6.03.2010

shirt refashion...

I have been wanting to alter a shirt for me but was kind of scared to take the plunge. Jess over at craftiness is not optional had done this post on "sprucing" some shirts. I thought the reverse appliqué idea was neat and super cute....so I decided to take a shirt I had in the garage sale pile to try it out on. It was a little short and stretched out. {So I figured if I messed it up, no biggie!}
I used some fabric from a Verna charm pack. I used my Creative Memories circle cutters to make patterns. I pinned the paper patterns to the fabric and used pinking shears to cut out the circles. Once I had the circles complete on the shirt, I added some buttons for an extra touch!

5.28.2010

owls, owls & {more owls!}

OK, so owls are starting to take over in Little Bit's room! I made this owl pillow awhile back. It now has a home on the top of her book shelf....along with a cute little ceramic owl container I found at Walmart during Easter. I also found this neat site where you can print some art for free. I printed this cute owl art and trimmed it down to fit in a 5x7 frame. The graduation owl on the 2nd shelf I found at Goodwill for less than $1!


This wall shelf was full of Cherished Teddies when the room was all bear decor. We have weeded out most of the bears but still like them...so they all aren't banned from the room...hehe!

I found the little glass owl at Pier One. The polka dot one I made! I just freehanded a pattern and used some Amy Butler fabric to whip him up. I cut the eyes and beak out of felt and added some buttons to the eyes. Here is a close up...

4.30.2010

Hip{hippo}ray for Quilts!

Little Bit and I took off last Friday for a girls weekend! We met up with my mom and sister and traveled to Paducah, KY for their annual quilt show. My grandma lives there, so we picked her up and set out to enjoy the quilts together! It was a great time and we saw lots of wonderful quilts and handmade items. What a great place to be inspired! I just might have to start piecing a quilt in the near future...a simple one of course! I have some leftover Sultry fabric from this project that I would love to use in a quilt!

Little Bit did very good....considering this trip was geared towards grown ups! She only had one major melt down and I think she was just hungry. Here she is {escaped from the stroller!} sporting her new outfit that I made her. Using the Verna collection from Moda Fabrics, I appliqued a hippo and little bird on a white t-shirt. Then I made a little skirt to match using just a fat quarter!!! Check out this tutorial for details.

4.20.2010

{Rag} quilt purse!

When I saw this purse on Chic 'n Scratch's blog, I thought....I want to make one! So, I gathered my supplies, followed her tutorial and this is what I came away with...{actually a pretty easy purse to put together!}
I just love this fabric! It is Basic Grey Sultry. I am a huge fan of the Basic Grey paper lines and was excited to play with some fabric! I actually got this fabric on sale from Hancock's in Paducah, KY.

3.21.2010

fabric scrap {basket}...

I saw this tutorial for a fabric scrap basket and thought it looked fairly easy and super cute! So I tried it out, just using some fabric that I had on hand. I just love how it turned out! It found a home next to my sewing machine and holds my scraps...just like the name says...LOL! Maybe once it gets filled up I can create this cute little doll quilt.

3.17.2010

{sew} cute pincushion!

I have a larger pin cushion that sets on a shelf in my sewing room, holding the majority of my pins. I wanted a smaller one that I could have by the sewing machine when working on projects. So I decided to make one! I used this tutorial to create this little cutie! I used a 5 1/2 inch circle to create the base as in the tutorial. Instead of a felt circle for the top, I cut out a felt flower using my Cuttlebug and the Flower Layers #3 die from Sizzix. Since there is a hole in the center of the flower, I added a chocolate chip corduroy button to hide the hole and add some extra pizazz!

3.16.2010

Creative Corner...fabric key chain

I have {sew} been in a mood to sew lately! I have a purse in the works which I hope to finish in the next few days. BUT in the meantime I wanted to finish something quick. I found this tutorial for a fabric key chain and just had to try it. It is far from perfect but I am happy with it.

I used Alexander Henry fabric Mocca-Red which can be found at your JoAnns! I just love the bright bold colors in this fabric {granted you can't see much of it on the key chain...but it is still pretty great!}. I found a red with white dots fabric to coordinate for the inside...which you can barely see in the below pic.
If you are looking for a fun way to spice up your key ring, or just a fairly easy sewing project...try this one out!

2.09.2010

Creative Corner...heart {day} shirt

I got this pink shirt on clearance at Walmart for like $1.50 after Valentines Day last year. It had an image on it that I wasn't crazy about so I thought why not turn it into something new!

To make the circle, I used my Creative Memories circle cutter and cut the size circle I needed out of paper. Then I pinned the paper to the fabric and cut out using pinking shears. Next I cut out 2 hearts of felt and whip stitched those on the fabric circle with embroidery thread. Then I used wonder under to apply the circle to the shirt. I finished it off by sewing on a little flower button on the brown heart.

What a cute remake to wear for Valentines Day and beyond!

1.28.2010

Creative Corner...owl bag {whoot!}

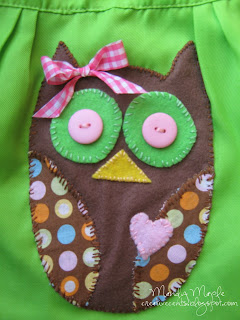
Several months ago I was in Target and found this little bag in the dollar spot. It was in a section marked 75% off...so I got it for ONLY 25 cents! I thought the style was cute {and would be a good size for Little Bit} but wasn't crazy about the image on it...a great candidate for some altering!I am a little obsessed with cutesy owls right now. So what better to applique on the bag! I sketched a pattern, making sure it was large enough to cover the image already there. I used mostly felt for the owl but wanted to tie the colors together somehow. The cute dot print was perfect for that. It was just some cotton fabric I had on hand. It worked great for the wings! I whip stitched it all on the bag with embroidery thread.

Then I added some Basic Grey buttons to enhance the eyes and tied some ribbon for a bow. {I wanted to make sure she was girlie!} I just love how it turned out! Here is a close up...

Little Bit loves her new bag and is having a blast "shopping" and filling it up! {I did have a thought to add her name across the band at the top of the bag...but that will have to come later!}

9.22.2009

Creative Corner...Owl Pillow

I have seen several variations on owl pillows lately and just thought they were too cute not to try and make one. So I free-handed a pattern and this is what I came up with! I just love how it turned out! This pillow will go on Little Bits bed once she moves out of her crib...not that I am wishing that anytime soon!