Showing posts with label Creative Corner. Show all posts

5.16.2015

new wall art!

I saw this printable on Charlie Fox Paper Co. and thought it was great.  So I saved the file to my computer and got to makin'!  She has it available in pink, blue or black.  I chose the black and then printed it on patterned paper.  I chose a blue hexagon pattern from Basic Grey's line Fact.  Then I trimmed it down to 8.5x11. 

I opened Word and inserted the image I had saved to my computer.  Then I loaded the paper in my computer and hit print! 

I used washi tape to hang it on the wall above my IKEA cart.

makers gonna make...

5.19.2014

vacation memorabilia...

We are about to head off on vacation, so I thought I'd share a tip for keeping track of memorabilia while vacationing!  Whether you scrapbook or not, it is nice to save some of the bits and pieces that you collect along your travels. 


I always bring ziplock bags of all sizes with me when traveling.  A gallon sized one is perfect for keeping track of all your receipts, brochures, tickets, scorecards, etc!  This helps keep everything together and protected from getting wet or crinkled.  

Then when you get home you can look through all your pieces and see what you want to save, scrapbook or toss.

Do you have any special ways of keeping track of your memorabilia when traveling?  What are your favorite pieces to save from your travels?

3.25.2014

3x4 cards in 4x6 slots...

I am not a person devoted to one certain type of page protectors.  For my Project Life album I usually float between American Crafts, We Are Memory Keepers and Project Life.  Most recently I was using these 6 - 4x6 type from We Are Memory Keepers.  But I don't always put 4x6 items in those slots.  I use quite a few 3x4 cards and photos as well. 
We R Memory Keepers - Page Protectors - 6 Up - 4 x 6 Inch Photo Sleeves - Fits 12 x 12 Three Ring Albums - 10 Pack
Here is an example of 2 - 3x4 cards that I was using on a layout.  The problem I have is that they tend to overlap and slide around in the 4x6 pocket.  As I was looking around my craft table I had an idea to use washi tape to secure the 2 cards together, making them the perfect size for the 4x6 slot!

I just chose a solid color washi tape that I rarely use, lined up the 2 cards face down and put a strip of tape in the middle.  This little trick holds them together nicely and eliminates the sliding!

Best thing is, you have no idea they are taped together when looking at them in the album!

Happy crafting!

8.01.2013

{simple} thank you

I like to have cards on hand for when I need them in a pinch.  With teaching this past year I found I needed quite a few thank you cards.  This was one of my quick and easy cards I mass produced to have a supply ready for when I needed them.  Even though there were so simple I think they look pretty cute! 


All you need to recreate this for yourself are some card bases {I use 8.5x11 cardstock cut in half, then fold each section in half...getting 2 cards from 1 piece of cardstock}, patterned paper, square punch or paper trimmer, stamp, marker, and rhinestones if you so choose!

The card is pretty self explanatory but here are the steps I used...

I started by selecting a group of paper that coordinated with each other.  I knew I wanted to use a square punch, so I visually divided the card into 6 sections.  I then punched 5 squares and adhered them to the card front.  In my 6th empty space, I used my marker to draw a faux stitched line in the shape of a square.  Then I stamped my sentiment inside this square.  I added a rhinestone in the center of the "o" for some extra pizazz! 

I love using Stampin' Up stampin' write markers.  They have a brush tip on end and a fine tip on the other.  I used the brush tip to ink up my stamp and used the fine tip for the faux stitching!  Gotta love a product that preforms multiple tasks!  ;)

7.01.2013

{super} girl...

Little Bit has been wanting a new cape to play with.  I made her one several years ago but the neck bothered her and it wasn't quite long enough anymore.  Luckily I had seen and pinned an idea for one not that long ago.  So...as fast as a speeding bullet we were off to get supplies!  ;)

 
All it takes is an adult Large or Extra Large shirt and something to decorate it with.  We got our shirt from Hobby Lobby.  They are only $3.99 and usually on sale or you can use a coupon.  Plus they have lots of colors to choose from.  I let Little Bit pick the color shirt she wanted...we got an adult large because it looked plenty big for her. 

Now to cut!  I started at the back bottom left, just to the right of the side seam.  I cut up all the way to the shoulder, about 2 inches away from the neckline.  Then I cut around the neck of the shirt, making sure to leave the neck hole in tact.  Once you get to the other shoulder cut all the way down the back until you reach the bottom of the shirt.

Tada...now you have a wonderfully soft and easy to get on and off super girl {or boy} cape!  :)

We then took puff paints and got to decorating!  Little Bit really wanted to do the painting herself but the paints have to be shaken and squeezed just right, so she ended up telling me which color to use and what to draw!  Waiting for the paint to dry was the hardest part! 

Now she's off to save the day!

{Sidenote....We saved the rest of the shirt.  You should have been left with the sleeves attached to the front panel.  It would make a great smock wearing it with the panel in the front.  Or wear it the other way as a pretend doctors coat!  We had fun decorating it too while we had the paints out!}

5.03.2013

house number {planter}

I have been wanting to get some spring decor up on the porch for several weeks now and this weekend I finally got around to it!  I got out a tiered plant stand that I had sitting in the garage and looked for things to fill it up.  We also had several clay pots waiting for some attention.  I had seen this pot with vinyl numbers on it on Pinterest and knew I wanted to do something similar.  

Well I didn't have any black vinyl on hand so I improvised! 

I simply cut the letters out of cardstock, using my Circut and the Cuttin' Up font cartridge.  I then used this as a stencil.

I placed it on the pot where I wanted it, traced around the template with a black Sharpie and then carefully shaded in the space.

Then a quick trip to Menards for a few plants and it was good to go!  I just LOVE how it turned out!

Here is the whole decorated porch entry!

Linking up with...

 
Skip To My Lou

4.04.2013

TWO more down...

Well I have knocked 2 more items off my Pinterest Challenge list!  So that makes 4 out of the 6.  I hope to get to the other 2 at some point...1 of them is a card so you think that would be fairly easy to accomplish!  ;)
 
I have been wanting a flat iron holder for quite some time now.  When I came across this pin on how to make one from a pot holder I was sold on making one.  Well I finally got around to doing it the other day!!!  

Here is the pot holder I started with.  I found it at Wal-mart for about $3.  It came with a towel, spatula and recipe card! 

All I did was fold it in half with the pocket on the outside and stitch from the pocket down all the way around the bottom.  I did have to take my foot of my sewing machine for it to fit in there.  Even then it was a tight squeeze.   But I got the job done!


Here is my straightener....snug as a bug in a rug!  The cord even has a nice snug home in the pocket!

Next up was some elephant art.  I had this one on my list to do but changed to this as my inspiration.   It will work double duty for me.  First as a welcome to guests on the entry table at my sisters baby shower.  Then as art work on the wall in her nursery! 

I loved the giraffe picture that I took my inspiration from.  I just went to my friend google images and searched for a profile picture of an elephant head.  Then I cut it out and traced it onto decorative paper.  I hand sketched the "hello" at the bottom.  I am loving how it turned out!

The other pins I finished for this challenge were patches for jeans and cinnamon roll waffles.  

3.21.2013

Easter {decor}!

After leaving my Valentines decor up for the whole month of February, I decided the first week of March it should come down!  Plus I was in the mood to decorate for Easter.  I had seen several neat ideas on Pinterest that I wanted to create for my own decor.   

First up was this peep bunny art that I had seen last year and thought would be so cute to make.  So I found a template for the bunnies here.  The three bunnies were just perfect for our family.  I just had to shrink one of the bunnies to make it smaller to represent Little Bit!  Then I cut them out, glued them on light green paper and added accessories! 


The hubs got a cute little yellow bow tie, Little Bit got a pink hair bow, and I got a blue necklace!   LOVE it!

Next up I created a chocolate paper bunny.  I had seen this painted bunny piece on Pinterest that inspired my idea.  I didn't want to paint, so I brought out the paper instead! 


First I went to my favorite place...google images...to search for an outline of a bunny.  I thought this one was perfect!  {Sorry I don't have a link, I can't remember where I found it!}  I printed it out, cut out the bunny and then traced onto brown paper.  

Once I cut out the brown bunny, I adhered it to a piece of yellow patterned paper and put in in a frame.

It has a home on our mantel with some cute yellow ceramic rainboots I found at Gordmans!

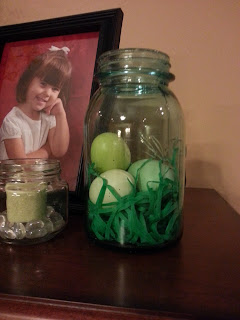
My last piece I'm showing is so simple to create.  I saw some jars on Pinterest where they put a chocolate bunny in with some edible grass and little candy eggs.  I thought they were SUPER CUTE but I wanted to make sure mine would last and not attract bugs or anything, cause I don't have lids for all my jars. ;)  So I went with some Easter grass from the Dollar Tree and some colored eggs {1 or 2 years old from Michaels I think}.

Have you been inspired to create any Easter decor this year?!


Skip To My Lou


3.01.2013

Pinterest Challenge...week 1 {patched jeans}

Last week I posted about a Pinterest Challenge that I was taking part in.  So...I didn't go in order of the way I numbered them but that's ok!  I didn't really think about the order I would do them in when I was writing that post.  I ended up starting with #2...patching some jeans with a hole in the knee.  Here is the link to my inspiration photo.

I have had these jeans for awhile and love wearing them but then I got a hole in the knee and decided I should probably toss them out.   Or maybe not, I thought.  I saw this cute pic on Pinterest and decided maybe I could save my jeans with some patches!
 
I dug through Little Bit's recent pile of clothes that she has outgrown and found these jeans.  I cut out three patches to use on my pants.  A large patch to cover the hole in the knee and then 2 other patches to balance things out. 

 I used Wonder Under and my iron to attach the patches. 

Then I decided they could be jazzed up a bit...so I accented each patch with some stitches.  Using yellow embroidery thread  I whip stitched around some of the edges on each patch. 

I also stitched some along the bottom hem of each leg, where it was fraying. 

I'm not sure if patches are in or not anymore but I think they turned out pretty cute if I do say so myself! 

2.21.2013

Pinterest Challenge

Who doesn't love Pinterest?!  There are just so many neat ideas out there to be found!  I have really tried to limit things I pin to what I might actually make, do, or whatnot...but before you know it you have pinned and pinned and pinned without doing anything with that inspiration.  So when I saw Janssen over at Everyday Reading post this Pinterest Challenge I decided to jump on board!

The idea is to take 6 things from your Pinterest boards and do them over the next 6 weeks!  So here are my pins I hope to accomplish during this challenge...


1...straightening iron holder.  I have been wanting one of these but not wanted to pay for one.  So when I saw this idea of using a pot holder I pinned it instantly. 
2...patches for jeans.  I have a favorite pair of jeans that recently got a hole worn in the knee.  I would love to add some cute patches and extend their life a bit longer!
3...cupcake card.  I so need to make some cards for my stash.  When I saw this card Kristina Werner made I loved it and knew I wanted to create something similar. 
4...shirt dress.  I have had this on my mind to do for quite some time but just haven't made myself do it.  I think Little Bit would love a new dress for her wardrobe!  She can be quite the fashionista these days!  ;)
5...elephant art.  My sister is having a baby in July and she loves elephants.  So when I saw this I knew I wanted to try and make a similar version for her.  Guess we will see how it goes!
6...cinnamon roll waffles.  YUM!  I have a waffle maker that doesn't get used enough, so now is the time to break that sucker out and whip up some cinnamon goodness! 


Sisters Share It All: Pinterest Challenge

1.10.2013

{OWL} craft and cute book...

I saw these cute owls made out of a toilet paper tube in some magazine a while back, think it might have been Parents but totally not sure.  So I thought I would give it a try.  
I started with an empty toilet paper tube and folded the top ends in towards each other to create the ears or owl tufts. 
Then I took a cute cupcake liner and cut it up.  By layer these overlapping on each other I created the belly of the owl! 
I punched out some circles for eyes and cut a small triangle for the beak.  Finally I cut a piece of cardstock to curve around the back to create wings.  I love how he turned out!!!  So simple and just using things I had lying around the house. 
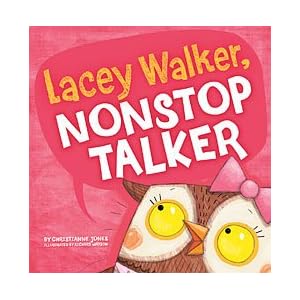
Little Boost Lacey Walker Nonstop Talker 
While we are on the subject of owls, I thought I would share this super cute book that we read recently.  It is called "Lacey Walker, Nonstop Talker".  It is about the cutest little owl who talks all the time.  This of courses causes her some problems.  When you talk all the time you can't listen very well.  One day she wakes up and can't talk...at first she is upset and wonders what she will do.  But then she starts listening and realizes what she has been missing out on.   Such a great story!  Little Bit and I both loved it!!!

9.25.2012

{autograph} book

We are enjoying fun times at Disney World this week!   One of Little Bit's favorite things to do is get characters names!  ;)  We used the same book for the last 2 trips, so I figured it was time for a new one...
 

I wanted one that was a decent size, big enough to include 4x6 pics in it but small enough to fit in my purse.  I also thought spiral bound would be good.  In my head I was thinking drawing book because it would have blank pages and be spiral bound.  Well I didn't realize there were so many different options.  I ended up choosing a mixed media notebook.  I liked the thickness of the paper in this one and knew I could easily alter it up!


I just added some cardstock, Mickey head and some letter stickers.  Then I took a ribbon and tied one end to a sharpie and the other to the book!  Happy signing characters!!!

Have you been to Disney?  What are your favorite things to do there? 

9.01.2012

owl canvas...

I saw this gift bag at Target and knew that I wanted to use it for some sort of wall art.  I orginally thought I would cut it apart and frame the owl on the branch.  Well, it wasn't the right size for a standard frame...so I went back to the drawing board.  Then I saw a painted canvas set that my friend made with an owl on one and a scripture verse on the other.  I decided I would create my own version using this gift bag owl.  


So I started by removing the handle from the bag.  Then I cut out the owl and branch.  I saved the sides of the bag, which were blue, and used them to make the circles on the canvas with the verse.  The yellow circles just came from some paper in my stash.  I picked up a 2 pack of 8x10 canvases from Michaels on sale and I also picked up some black letter stickers from Hobby Lobby.  I used Mod Podge to adhere everything to the canvases! 


I just love how they turned out!  Here they are hanging in my classroom at school!  ;)


Linking up with...

Made by you Monday @ Skip to My Lou
Organize and Decorate Everything

8.21.2012

photo {clip} frame...

I recently showed you a washi tape covered M that I made for my craft room.  It has been so much fun decorating and organizing my new space.  So today I thought I'd show you another project that I created.  It is a photo clip frame!


This was my inspiration...
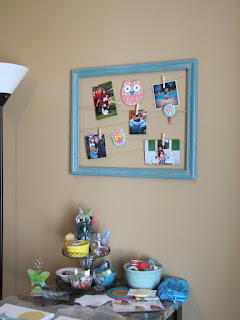
I saw this clip wall frame at Pier1 and knew I wanted it for my new craft room.  Well, when I was getting ready to actually go buy it, I decided that $28 was a little much to spend on just a fun element for my space.  So I decided to use this as inspiration and see what I could make.

So....off to Goodwill I went in search of a frame.  I was thinking I would just find a neat frame and then have to paint it the color I wanted.  Little did I expect to find a frame that was the perfect color to match my room!!!

Yeah!...I love how it turned out.  I still can't believe that I found the perfect colored frame.  All I did was take out the picture and the glass.  Then I used some hemp twine and weaved a zig zag pattern through the metal staples on the back of the frame {you know the ones that usually hold the picture in}.  ;)

I used mini clothespins to add a few photos and some owl tidbits and it was good to go!

It hangs right over my craft island.  {I love having a place where I can stand up and craft!}

....Slowly but surely I'm showing you my new craft space...stay tuned into the blog for more pics!


Linking up with...


Organize and Decorate Everything