3.27.2013

Pinterest Challenge...{cinnamon roll waffles}

OK...so I'm getting to these Pinterest Challenges slowly but surely!  Next up on my list to try were cinnamon roll waffles.  All you need is a can of cinnamon rolls, waffle iron and cooking spray. 

Heat up your waffle iron, spray with cooking spray and then put on cinnamon roll in each section.  {Mine was only a 2 section waffle maker so it took me a while to cook my whole package of cinnamon rolls.}  Close the lid completely and let cook for a couple minutes.  I didn't time it, just checked them to make sure they weren't burning.  I took them out when they looked golden brown.  The cinnamon on top of the rolls did get a little darker.

Once they were done, we just spread the icing that comes with the cinnamon rolls on each waffle and gobbled them up!  They turned out pretty tasty!

My basement is finally back together after our little flooding incident...so maybe I can get to my Pinterest sewing projects soon!

3.24.2013

Burt's Bees {review} & GIVEAWAY!

Once again I have more great products to share with you courtesy of Meijer and Burt's Bees

"On average, a woman can ingest up to nine pounds of lip product in her lifetime.  So for me, it's a must to choose one that's all-natural.  Burt's Bees now has a great selection of lip color products - all which care for your lips, feel great to wear, and have natural, delicate aromas - I just love them!"  Katey Denno, Celebrity Make-Up Artist

When I read that I was like wow...I put something on my lips everyday and multiple times a day.  I never thought about what was in the products or that I was ingesting them!  But really, how often do you find yourself licking your lips, drinking, eating, etc, all which bring the lip products into our system!  So I was super excited to try out these all-natural products from Burt's Bees!


Look at all these wonderful colors and varieties there are to choose from!  There is tinted lip balm, lip shine, lip gloss and lip shimmer.  My favorites at the tinted balm and the lip gloss!  

I was sent the color Sweet Violet tinted balm and I love it!  It feels so nice going on and gives my lips a nice color, without being too overpowering.  I love the way my lips feel moisturized! 

I think the gloss and shine products are similar in my opinion, just different types of applications and color choices.  I liked the Blush color in the lip shine. 

My favorite lip gloss color is Sunny Day.  It is a great neutral color to wear on it's own....like I am doing here.  I couldn't get a great picture but it is totally natural with a nice glossy glow!  But I also love wearing it over the lip shimmer.  

I tried the Rhubarb lip shimmer.  It has a nice mint scent that I loved but the color was a little too much for me.  I am a more natural girl.  However, once I applied the Sunny Day lip gloss over the top of the Rhubarb it totally toned it down and I was good to go for the day. 

Some 4x4 cards were also included with my lip products.  They included helpful beauty tips, like which colors to try depending on your complexion and layering ideas of which products work well together.

Who would love some of these great Burt's Bees lip color products to try out for themselves?!!!!  Well then, lets have a little giveaway shall we....

1.  Visit Burt's Bees website, checkout the lip color products and then come back here to comment, letting me know which one you are most eager to try.
2.  Become a follower of my blog and leave a comment letting me know you did so.  If you are already a follower, leave a comment letting me know that!
3.  Share this giveaway in some way...on your blog, facebook, instagram.  Then leave a comment letting me know how you shared. 

Winner with receive a sampling of lip products and some of the beauty tip cards!  You have until April 2nd to enter! 

If you can't wait to run out and try these products check them out at Meijer!  From now through April 13th everyone can enjoy a price drop of $1.50.  Plus here is a printable coupon for $1.50 off any Burt's Bees lip color product!

3.21.2013

Easter {decor}!

After leaving my Valentines decor up for the whole month of February, I decided the first week of March it should come down!  Plus I was in the mood to decorate for Easter.  I had seen several neat ideas on Pinterest that I wanted to create for my own decor.   

First up was this peep bunny art that I had seen last year and thought would be so cute to make.  So I found a template for the bunnies here.  The three bunnies were just perfect for our family.  I just had to shrink one of the bunnies to make it smaller to represent Little Bit!  Then I cut them out, glued them on light green paper and added accessories! 


The hubs got a cute little yellow bow tie, Little Bit got a pink hair bow, and I got a blue necklace!   LOVE it!

Next up I created a chocolate paper bunny.  I had seen this painted bunny piece on Pinterest that inspired my idea.  I didn't want to paint, so I brought out the paper instead! 


First I went to my favorite place...google images...to search for an outline of a bunny.  I thought this one was perfect!  {Sorry I don't have a link, I can't remember where I found it!}  I printed it out, cut out the bunny and then traced onto brown paper.  

Once I cut out the brown bunny, I adhered it to a piece of yellow patterned paper and put in in a frame.

It has a home on our mantel with some cute yellow ceramic rainboots I found at Gordmans!

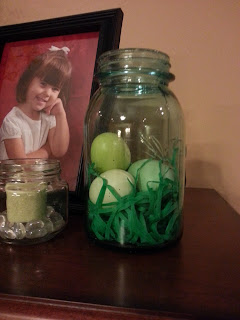
My last piece I'm showing is so simple to create.  I saw some jars on Pinterest where they put a chocolate bunny in with some edible grass and little candy eggs.  I thought they were SUPER CUTE but I wanted to make sure mine would last and not attract bugs or anything, cause I don't have lids for all my jars. ;)  So I went with some Easter grass from the Dollar Tree and some colored eggs {1 or 2 years old from Michaels I think}.

Have you been inspired to create any Easter decor this year?!


Skip To My Lou


3.18.2013

Menu Plan Monday


Monday ~ chicken caesar burgers, tater tots, fruit
Tuesday ~ crock pot pork chops, green beans, mashed potatoes
Wednesday ~ scrambled eggs, english muffin, sausage
Thursday ~ parmesan tilapia, green beans, mashed potatoes
Friday ~ chicken parmesan, salad, bread, corn

Linking up with Org Junkie...check them out for more recipes.

3.17.2013

Dr Seuss week....clothes!

Oh the thinks you can think and the things you can wear!  LOL!  I shared some of our activities from Dr. Seuss week here but also wanted to share my outfits from the week. 

Monday...I only had 1 actual Dr Seuss shirt and I knew I was wearing it later in the week, so I decided to whip up a Cat in the Hat shirt super quick.  I found a hat template online and cut it out of white felt.  Then I cut the strips apart and cut every other one out of red felt.  I hot glued the red strips to the white.  Then I glued it all to a blue t-shirt that was in my Goodwill pile.  Then I took a black sharpie and outlined everything. 

Tuesday...We did Tacky Tuesday, in honor of the book Wacky Wednesday.  Since I have a TTh class and a MWF class I had 2 dress up days.  So this is day 1 of the craziness for me! 

Wednesday...Wacky Wednesday!  Another day of craziness!  I even taped shoes on the walls for the kids to find.  We had a rode on the side of a bookshelf to drive cars on and we colored under the table!  We also walked backwards on our way to recess.  The kids so loved dressing up and acting wacky and I did too!

Thursday...We did some fish activities so I thought it was appropriate to wear my 1 fish 2 fish shirt this day!  I found this at Wal-mart last summer.

Friday...My partner in crime, AKA the other 3 year old teacher, and I were Teacher 1 and Teacher 2!  I found the printables for these on Pinterest.  Then I just dressed in the colors of Thing 1 and 2.  This might have been my favorite outfit of the week! 

Happy Birthday Dr Seuss...can't wait to celebrate you again next year!!!

3.16.2013

Colgate Optic White

I recently received some Colgate Optic White products to try.  I am a huge fan of the Optic White toothpaste.  I love the way it makes my mouth and teeth feel and look.  I do often drink soda, coffee and hot tea so I'm subject to staining.  I love that my teeth instantly look whiter after each time I brush.  

I was super excited to try the 360 degrees toothbrush.  I could really feel it surrounding my teeth and getting into the nooks and crannies.  It is also complete with a tongue and cheek cleaner on the backside of the bristles.  I don't always use this feature but nice to know it's there!  ;)

Mouthwash is something I don't normally use because I haven't found one I really like the taste of or that doesn't burn or leave a weird after taste.  The Optic White version was surprisingly pleasant.  The flavor wasn't too over powering and it didn't burn. 

I could definitely see myself using and buying all these products!  There are several other products available in the Optic White line. 

Products were provided by Meijer and Colgate-Palmolive for review purposes.

3.15.2013

wet basement...

Well I have been absent from blogland for a little while cause we had a mess to clean up....ugh!  Our pump quit working and we got water backed up in our basement.  Luckily it was only about an inch and we didn't lose anything major...but we did have to get the carpets dried out, replace our padding and baseboards.  And do you recall that we have lived in this house for less than a year!  Go figure. 

Here is the unfinished part where most of the water was.  

 
Then in the finished parts it was mostly wet around the perimeter of the rooms.  This is the bedroom after the carpets were ripped up, pad removed and furniture up on foam blocks.  

One big bummer was the baseboards were ruined.  They just soaked up the water and had to be replaced.

We had the last of the workers in today to finish up down there.  Hopefully we are back to normal now.  I have lots of posts to catch up on....so look out!

3.04.2013

Dr Seuss activities...

Last week at school we celebrated the wonderfulness of Dr Seuss!  I have so many pictures to share that I am breaking it into 2 posts.  This one is activities and crafts that we did.  The next one will be the outfits I wore!  ;)
Simple paper plate Cat in the Hat!  Just take a paper plate and have the kids paint around the outside edge.  Draw a cat face in the center and then attach a hat!

I made these truffula trees by twisting yellow and black piper cleaners together and then hot gluing a large pom pom on one end.  The kids had fun sticking them in the playdoh. 

I printed off a hat, drew some lines and circles for this tweezer transfer activity.

This was a one fish, two fish, red fish, blue fish activity.  The kids had to count how many ovals there were on the big fish and then paint it red.  The little fish were just glued on. 

We rolled the dice and counted the dots to know how many fish to add to the bowl.


I created these Lorax and Cat in the Hat props for a fun photo opportunity with the kids!  They loved this!!!

And of course we read some great Dr Seuss books!  How did you celebrate Dr Seuss' birthday?

Stay tuned for my Seusstastic wardrobe!!!

3.01.2013

Pinterest Challenge...week 1 {patched jeans}

Last week I posted about a Pinterest Challenge that I was taking part in.  So...I didn't go in order of the way I numbered them but that's ok!  I didn't really think about the order I would do them in when I was writing that post.  I ended up starting with #2...patching some jeans with a hole in the knee.  Here is the link to my inspiration photo.

I have had these jeans for awhile and love wearing them but then I got a hole in the knee and decided I should probably toss them out.   Or maybe not, I thought.  I saw this cute pic on Pinterest and decided maybe I could save my jeans with some patches!
 
I dug through Little Bit's recent pile of clothes that she has outgrown and found these jeans.  I cut out three patches to use on my pants.  A large patch to cover the hole in the knee and then 2 other patches to balance things out. 

 I used Wonder Under and my iron to attach the patches. 

Then I decided they could be jazzed up a bit...so I accented each patch with some stitches.  Using yellow embroidery thread  I whip stitched around some of the edges on each patch. 

I also stitched some along the bottom hem of each leg, where it was fraying. 

I'm not sure if patches are in or not anymore but I think they turned out pretty cute if I do say so myself!